Wednesday, November 23, 2016

Triple Baby Quilt Tutorial and a Sale!


Happy Thanksgiving All!

I'm super excited for Thursday. This is the first fall I've been an official empty-nester (even though my daughter is only 20 minutes away at school.) I'm so happy everyone will be under the same roof for the weekend.

We usually spend the day with my husband's extended family. This year's gathering will be especially sweet, because there will be a new baby in the mix! He'll be about 4 months old. And he'll be joined by a cousin in December! Which means, of course, baby quilts are required!

When I started these baby quilts, I knew I wanted to make them gender neutral with a simple design. I found a perfect fat quarter bundle in my stash which included 3 novelty fabrics: giraffes, elephants and kitties. Yes please! As I started designing, I wanted to make the novelties the stars, so I set them as a large center panel and went from there. And since I had 3 of these "panels" three quilt were made. They came together quickly and I'm really happy with the finishes. And because I did all the math, I figured why not share the pattern. Below you'll  find the tutorial to make 3 baby quilts or The Triple Baby Quilt Tutorial! (BTW only 2 are finished ~ the third is still a top waiting it's quilting!)


Triple Baby Quilt Tutorial


16 or so fat quarters
2/3 yard  Border fabric (per quilt)
3/8 yard  Binding fabric (per quilt)


Start with a novelty fat quarter. Fat quarters typically measure 18" x 22". Your mileage may vary. Trim your fat quarter to the largest square you can get out of it. For one of my quilts it was 17 1/2". The other one must have been an off cut, because I could only get a 16" square out of it. It doesn't really matter. Take the measurement of the square (let's say 17 ½") and subtract ½" to give us the finished size. That gives us 17". Take that number and subtract from 20". So, that yields 3". Divide that in half ( which makes it 1 ½") Add back in ½" for seam allowance. 2" is our measurement. This is the width of the first set of borders you'll cut. The goal is to have our fat quarter with one border equal 20 ½" square (20" finished.) 
I'll run through that one more time.

We'll start with an  18" square. Subtract ½" to yield 17 ½". Subtract that from 20" to get 2.5". Divide in half (1 ¼") and add back in ½" to give us 1 ¾" wide borders to cut.

Cut 2 strips width of fabric. From each strip, cut one length to equal one side of your center square andthe remainder to 20 1/2". 

Sew the shorter border strips to each side of your starting square, then the 20 1/2" strips to the top and bottom. Your quilt top should measure 20 ½" square at this point.

Repeat with 2 other fat quarters and borders.

Take the remainder of your fat quarters and cut into strips 5 ½" x 22" (or whatever the longest width of your fat quarter is.) Sub-cut  strips into 5 ½" squares.

22"

18 "

You should get 9 squares from each fat quarter. You may be able to get 12. If those last cuts don't measure up to 5 ½" square, no worries. Set them aside for now.

Take your 5 1/2" squares and make two columns of 4 squares and 2 rows of 6 squares. Mix them up for a nice variety. Sew the columns to each side of your top, then sew the rows to the top and bottom of your top. Your top should measure 30 ½" square.

Cut second set of borders, (2) 2 ½" x 30 ½" and (2) 2 ½" x 34 ½". Sew the shorter borders on the sides, the longer borders top and bottom. Your top should measure 34 ½" square.

Now time for some improvisation!

Stack (2) 5 ½" squares right sides together. Sew a ¼" seam on the right side and the left side of the stacked squares. Using a ruler and rotary cutter, make a vertical cut, dividing the stack into 2 pieces. Continue to stack, sew and cut. As you cut the stacks into 2 pieces, vary the width of the cuts. The goal is NOT to have the cut be in the exact middle, but have variations in the widths of each piece.


Continue to stack, sew and cut pieces. If you have some pieces from earlier that weren't quilt wide enough, use those now. Stack two pieces together, matching the left edges (5 ½" on the side.) Trim the right edges even if necessary. Sew and cut as above.

Take a bunch of your newly cut pieces, and sew together (on the 5 ½" edges) until you have a  column approximately 36" in length.  Press. With a long ruler and rotary cutter, trim one long side edge straight. Measure over 2 ½" and cut a long border. Measure over another 2 ½" and cut a second long border.  Make 3 to yield 6 short borders. (You'll use 2 per quilt.)

Make another column, this time approximately 40" long. Trim as before. Make 3 to yield 6 long borders.
Sew 2 short borders to each side of one quilt top. Trim to fit. Add long top and bottom borders. Trim to fit. (Mix up the borders from the previous step, so that you're using different borders in each quilt.)

Baste quilt and bind quilts. For one, I quilted with an all over meander. For another, I did a giant spiral. The third is TBD. Cut binding strips 2 ¼" each x wof. You'll need 4 strips for each quilt.

There you have it! Three baby quilts!


I'm not much for shopping on Black Friday, but I do make exceptions for fabric. I'm sure I'll be hitting up Craftsy for classes (only $17.99!) and kits. I'll typically buy their quilt kits, more for the fabric than the quilt itself. Lots of great deals! Shop the sale here.

Ready for another sale? Visit my Etsy Shop and use the code GIVE2016 to get my downloadable subway art for $5 (usually $8!) Available in aqua, tangerine and black. I like to have it printed on canvas for a addition to my sewing room. The file also includes an 8 x 10 jpg you can print at home. Discount expires 12/1/16.


Happy Thanksgiving All!


post signature


Monday, October 17, 2016

Artful Improv Blog Tour and Giveaway!

I'm so pleased to be part of the blog tour for the book Artful Improv by Cindy Grisdela. 


I met Cindy at an art fair in Annapolis about 5 years ago. It was just months after I started the Baltimore Modern Quilt Guild, and I was so thrilled to find an artist that shared the same aesthetic. I'm not even sure if I had ventured into improvisational piecing at that time, but her art quilts certainly inspired me to jump in.

There's so much great content in Artful Improv. A first flip through, and you'll be visually delighted with all of her quilts. As you dive deeper, you'll begin to see how she thinks, plans, executes and finishes her quilts.


As Cindy says in the chapter How to Use This Book: This is a hands on book. Play with the exercises to expand your comfort zone and experiment.

I'm eager to try one of her signature styles, which I think of as ribbons on a present.


Her use of color and scale -  so good!

Did I mention that Cindy is a master at curves? I'm eager to try some of her curved piecing techniques.


Cindy also dedicates a chapter to machine quilting (something that I find challenging, but am working on improving :-))
Look at all that wonderful texture she creates!

More than just a quilt book, I know you'll be reaching for Artful Improv over and over.


Would you like to win a copy of Cindy's book? Just leave a comment below, answering this question: Have you tried improv quilting before? Of course, my newsletter subscribers always get an extra entry (just let me know in a separate entry that you subscribe!) US winners will receive a print copy of the book, international winners will receive a digital copy. Winner will be drawn on October 20. Please make sure I can contact you via email.


October 10: C&T Publishing http://www.ctpub.com/blog/
                
October 11: Maria Shell https://talesofastitcher.com/

October 12: Rayna Gillman http://studio78notes.blogspot.com/

October 13: Yvonne Fuchs http://quiltingjetgirl.com/

October 14: Sujata Shah http://therootconnection.blogspot.com/

October 17: Heather Kojan http://www.heatherkojan.com/  YOU ARE HERE!

October 18: Generation Q Magazine http://generationqmagazine.com/

October 19: Cindy Grisdela https://cindygrisdela.com/blog/


post signature

Tuesday, September 27, 2016

A New Spin On Drunkard's Path Blog Hop and Giveaway!!

I'm so happy to introduce you to my friend John Kubiniec, author of this fantastic new book A New Spin on Drunkard's Path. 


John and I met a few years ago at Quilt Market in Houston. We were co-authors for the book Classic Modern Quilts. After meeting, we became fast friends and soon had our own inside jokes!

Geography separates us, but we still manage to chat and see each other a few times a year. 

After hearing about it for several months, I'm so thrilled to see his book A New Spin on Drunkard's Path in print. What a treat! Simple fabric manipulation gives so many varieties. You have to see it!

Bowties Quilt from A New Spin on Drunkard's Path


There are several projects from the book that I'd like to make. I'm a scrappy gal at heart, so the Bowties quilt called out to me. I made a few that I think will ultimately become a baby quilt. Scrappy pink and grey? Yes!  I tried out a few different layouts. I definitely need to make some more before I can decide. John has several great tips for working with the drunkard's path ruler. He also shares wonderful tips on pinning - fork pins! Who knew? 


Peppered Cotton Background = curly edges!


Would you like to win a copy of the book? John is giving readers the chance to win a copy of his book and a set of the Drunkard's Path templates he uses. To enter, answer this simple question (feel free to elaborate!): Have you tried curved piecing before? Just comment here for your chance to win. For extra chances, follow me and John on instagram (be sure to come back here to let me know that you do.) And my newsletter subscribers always get an extra chance as well! (Just comment that you subscribe.) Two winners will be drawn on October 8th and notified by email (one for the book, one for the template.) If you're a no-reply blogger, please be sure to leave an email address where I can reach you. A US winner will receive a hard copy of the book, international will receive an e-book.

Congratulations, John! The book is fantastic!

Be sure to visit all the other bloggers on this blog hop:


September 26, 2016
Jenifer Dick   www.42quilts.com

September 27, 2016
Heather Kojan http://www.heatherkojan.com  You are here!!!

September 28, 2016
                          
September 29, 2016

September 30, 2016
LoveBug Studios https://lovebugstudios.com/blog/

October 1, 2016         
Kathy Patterson  http://hillstreetquilts.blogspot.com

October 2, 2016

October 3, 2016
Generation Q Magazine http://generationqmagazine.com

October 4, 2016
Nicole Daksiewicz www.modernhandcraft.com/blog

October 5, 2016
            Marti Michell http://frommartimichell.blogspot.com

October 6, 2016
Kim Niedzwiecki http://www.gogokim.com

October 7, 2016

post signature

Wednesday, September 21, 2016

My Modern Spools Mini in Modern Patchwork Magazine!

So this happened a few weeks ago:


My Modern Spools mini quilt in Modern Patchwork Magazine! This is the Gifts edition - chock full of seasonal decor and gifts to give (or keep for yourself!) What I like is that the projects aren't overly "holiday." Switch out some fabrics and they'll work for anytime. With over 30 projects, I'm sure there's several you'll want to make (after you make my Spool quilt of course!) Me? I think I'll start with Violet Craft's paper pieced cardinal. She has it as a table runner, but I think one bird would make a great pillow. And the salt cellar pincushions? Adorbs. I have some old votive holders that I think would work perfectly. 

Oh, and this is fun. Modern Patchwork asked contributors to send in their favorite holiday recipes. You'll find my Sweet Potato Latke recipe in the issue. Think sweet potato french fry - just flattened and with more crispy edges. Delish. 


The hard copy is on newsstands now. Over 30 patterns! Go! Now! Buy! Sew!


post signature

Friday, June 10, 2016

My Interview with Cheryl Arkison on the C&T Blog

Super excited to share my interview with Cheryl Arkison. She's one of my favorite quilters, and I've been known to spend a few hours here and there reading her blog. She's an excellent writer and inspirational improv quilter.

I had the pleasure of meeting Cheryl at Quiltcon in February! (we're cute!)


Head on over to the C&T blog and check it out!
post signature

Sunday, May 29, 2016

A closet full of clothes....


....and nothing to wear.

Except, this is more like: a closet full of quilts, and not a dang one to put on the bed.

Yesterday I decided it was time to get rid of the "winter bed" and break out the "summer bed." With temperatures now reliably in the 70's, it's time to shed the bed of the heavy fleece sheets and double puffy, not very attractive but oh so warm quilt in exchange for lighter, whiter sheets and our summer quilt.

Except we don't have a summer quilt.

We have quilts. Lots of quilts. Not lacking for quilts here. Its just the size that isn't right. I only have two king sizes quilts and don't want to use either one of them (one being the previously mentioned not very attractive one, the other being this one


which I like very much, but it's so 5 years ago. And needs considerable mending.)

So I'm making a new one. And because a king sized quilt does not happen overnight, I think I'm going to reprise this pattern: 


Large blocks (I'll need 9) that go together quickly. Well, as quickly as a king sized quilt can go. I'm optimistic, though, that I will sleep under this quilt by summer's end. Which gives me about 4 months. Easy peasy!
post signature

Friday, May 20, 2016

My Interview with Bonnie Hunter!

Hey there!

I'm super excited about a new series I'll writing for the C&T Publishing blog we're calling Quilter's Bucket list. I kicked off the series with the one and only Bonnie Hunter!!


Every quilter has a quilt bucket list - right? The list of quilts they want to make in a lifetime. The series is about chatting with our favorite C & T authors about what might be on their quilting bucket list. Fun, right?

It was so much fun to interview Bonnie. She's funny, authentic and just so nice!

Read my interview with Bonnie here.

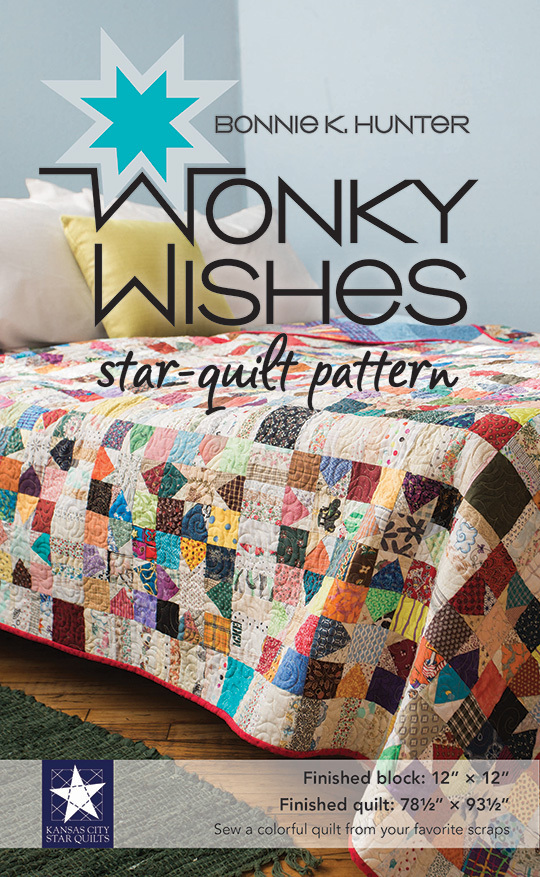
Wonky Wishes Star Quilt Pattern
this post contains ad links
This is Bonnie's latest pattern.  It's a big quilt that uses a ton of scraps! (Look for her new book out in September.)

So, two questions for you:

1. What C & T authors would you like to see me interview?
2. What's on your quilting bucket list?
post signature

Saturday, May 14, 2016

Paper Piecing - I finally get it!

*this post contains ad links.

There are a few things I'm known for in my quilting circle. One is my dislike for variegated thread. Another is for my disdain of metallic fabric. (I'm working on both of those issues and will report back as soon as I've resolved them.) The third is my avoidance of paper piecing, or, as I like to school people - foundation piecing. And just let me say, about the thread and fabric, I enjoy them when they're used in other people's quilts. Just not in mine.

I actually made a paper foundation pieced quilt about 15 years ago. And I did it the old fashioned way: I went to the library, found a book by Carol Doak, took the book to Office Max and printed the foundation papers and went home and sewed it. It took about a weekend and I was actually quite proud of it. And also over it at the same time. Done. Next.

My First Paper Pieced Block/Quilt Circa 2001


Fast forward about 10 years and I'm in a ton (6 or 7) online bees and EVERYONE wants the flying death circle of geese block. I added "death" because that's how it feels after spending 4 hours to produce a 12" block and THEN you realize you have the whole thing backwards.

A block from my on line Flickr bee Bee Vintage

Done. Next.

Over the course of the next few years, people would try to lure me to the pulp side (so precise! perfect points!) but I always refrained. Nope. Not for me.

So I was quite surprised with myself when I voluntarily purchased this pattern and made not one, not two but three of these!!

I bought it because I signed up for the Rainbow Mini Swap at the Mid Atlantic Mod retreat in April. I thought it was the perfect pattern for the swap. And, I wanted to show off a bit and bring an awesome swap quilt. (Which it was, and very much in demand - as we do a dirty Santa type way of distributing the quilts. Oh, and funny, there was an identical one to mine in the swap - even quilted the same. Great minds and all.)

Anyway, the pattern was quite a work out. The first one took a solid weekend. Then I had the bright idea to make two at a time: one for my secret sewist at the retreat, the other for me, because its so cute and I really wanted one!

That plan was working great until I realized there was no way to finish both in time for the retreat, so I bailed on mine and finished my partner's.

I'm happy to say, though, the third is finished. And a charm. Charming. I learned a ton, found what works best for me and, dare I say it, I've started on another project!


If you're not so much a paper piecer, may I suggest you visit my first teacher Carol Doak here or here. She really is the best. And while you're at it, get this paper. It's the easiest I've found to use

post signature

Tuesday, May 3, 2016

Quiltmaker's 100 Blocks Volume 13 Blog Hop and Giveaway!

Welcome to Day 2 of the Blog Hop! I love Quiltmaker's 100 Blocks ~ like a mini encyclopedia of new blocks twice a year! Here's what the latest edition look like, so you can find it at your favorite quilt shop or craft store.


You can find the complete list of blog hoppers here. Giveaway information at the end of the post!


My block for Volume 13 is called Rocket.


The inspiration for this block came courtesy of a Holiday Inn. Yes, inspiration is everywhere!

I was teaching near Atlanta about a year ago. Throughout the Holiday Inn were these origami art pieces with little rockets. Of course, I thought quilt block. But then again, I always think quilt block.


Simple, graphic. Just what I like! And so many options for different color ways. I love the neutral palette with the pop of aqua/red, don't you? 

I did a quick mock up of Rocket in EQ7. I thought this would be a sweet quilt for a toddler. What do you think? Should I write up a pattern?


On to the giveaway! Would you like to win a copy of Quiltmaker's 100 Blocks Volume 13? If so, just leave a comment below. If you'd like to sign up for my newsletter (scroll back up to the top of the page) you get an extra chance! Newsletter subscribers get advanced notice of pattern releases, freebies, giveaways and more! For another chance, follow me on Instagram. I'm @heatherkojan. (Leave another comment saying you signed up for the newsletter and another for following on Instagram.) 

Thanks so much for stopping by, and enjoy the rest of the blog hop!
post signature

Friday, April 29, 2016

I have a few free minutes...

So let's start a new quilt!

Do you feel that way too? Every so often I get a pocket of time with no commitments, no travel, no deadlines ~ just free time to sew for myself. This is one of those times. Nothing major on my plate for 2 whole months! So what do I want to do? Fill up that space with new projects.

I started a list of the new:


  1. Amy Butler Weekender Bag (so 5 years ago) but I've had the pattern forever and still want one.
  2. Sew Together Bag (so 2 years ago) same as above
  3. Fancy Fox - new baby boy due in the family around July
  4. Cover the vintage chairs I scored at Goodwill about a year ago


And then I thought, "Whoa, hold on sister! Maybe you should tackle some of the old." Such as:


  1. Loulouthi Quilt: needs backing/basting/quilting/binding (b/b/q/b)
  2. Twizzle: Just pieced the top this past weekend - needs borders and b/b/q/b
  3. Plus Quilt: Same as above
  4. Modern Meadow: needs borders and b/b/q/b
  5. Sewing Machine Mini: I made 2 for gifts, this ones for me! Finish piecing and b/b/q/b
  6. Bento Box: had the blocks for years - needs piecing and b/b/q/b
  7. Yellow/Gray Bee Quilt: ditto above
  8. Vintage Charm Quilt: b/b/q/b
  9. Pinwheel Pillows: these are samples from a retired class. Just need to assemble.
  10. Facing East: just started this one. A long term project for sure
  11. Paper Pieced Stars: Another long term one.
  12. Moda Building Blocks: all the large blocks are finished - on to the 6 inchers


I'm sure there's more if I dig a little deeper into the UFO bin. But keeping the list at a dozen seems somehow more manageable.

No pictures today. That would take another hour or so. Time better spent actually making. I'll post them as I finish them (or at least move them closer to the finish line.)

Instead, I'll leave you with a picture of my kids. All.Growed.Up.


Happy Quilting!

post signature

Friday, March 11, 2016

Organizing Fabric

If buying fabric is a quilter's #1 pleasure, I think organizing it can't be too far behind. Just a quick google of "sewing room organization" or "fabric storage" reveals such wonderful eye candy.

Truth be told, I have a decent sized studio (I started calling my basement sewing room a studio a few years ago - makes me sound more legit  :-) I have ample storage. But that doesn't stop me from looking for alternative solutions.

Last week, I was out doing errands, which happened to take my by our local Goodwill store. Most times, I'll drive on by. On this particular day, I heard it whispering "Come in - I've got something for you." How could I resist an invitation like that?

I quickly made my way through the front of the store. No voices. But in the back - cue the angel choir! I found this:


Yes, not much to look at, and a little bit 90's with it's wonky shape. But oh, the potential. (And I am a bit partial to wonky.)

After a few quick coats of spray paint:


And all loaded up with fabric and stuff:


I like that it holds some of my vintage Pyrex! And the width is a good size for half yard cuts of fabric.

A bowl full of Allison Glass


Cute storage for under $10! I like it!

What are sewing up this weekend?

post signature